Note 09 · Gear Care / Footwear
After a muddy walk
A five-step routine for boots: knock, strip, wash, dry slowly, and treat only when the material asks for it.
Mud left on a boot is not just untidy. As it dries it draws moisture and oils out of leather, stiffens fabric and holds grit against stitching, where every later step grinds it in. Cleaning boots is mostly a matter of not letting that happen, and it takes less time than finding reasons to put it off.
Where the dirt goes
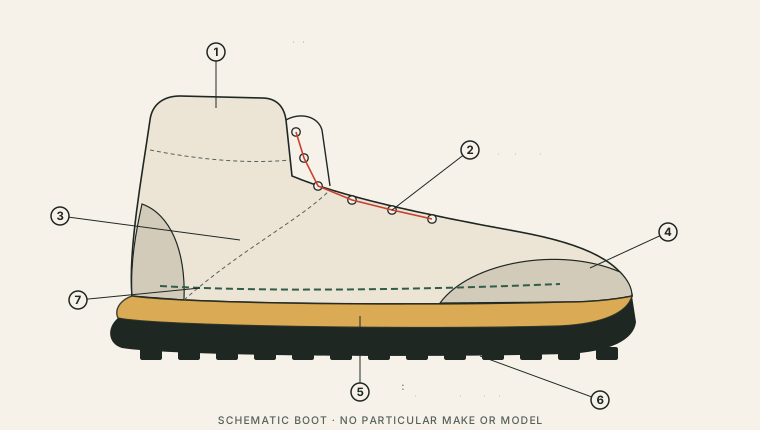
The obvious mud is on the outsole and the lower upper. The damaging dirt is in the places that flex or fold: the gusset behind the laces, the line where upper meets sole, and the seams.
Five steps
- Knock and brush. Outdoors, bang the soles together and dry-brush off whatever comes away easily. Mud that falls off dry does not need washing off.
- Strip. Take out the laces and the insoles. Both dry faster apart from the boot, and the boot dries faster without them.
- Wash. Lukewarm water and a soft brush over the whole upper. Use an old toothbrush for the gusset (2), the welt (5) and between the lugs (6). Skip household detergents and soaps unless the care label names one; a cleaner made for footwear is the usual alternative.
- Dry slowly. At room temperature, in moving air, away from radiators, fires, heaters and strong sun. Stuffing the boots loosely with newspaper draws moisture out; change it when it is damp.
- Treat when the material asks. Not every time. Leather that looks pale and dry wants conditioning; fabric that no longer sheds water wants re-proofing.
The one rule that matters
Never dry boots fast. Direct heat can crack leather and weaken the adhesives that hold a boot together, and damage of that kind cannot be washed out again.
By material
| Upper | Clean with | Then | Take care |
|---|---|---|---|
| Full-grain leather | Water and a soft brush | Condition sparingly when the leather looks dry; proof or wax as the label advises | Too much conditioner softens leather and reduces support |
| Nubuck and suede | Water and a soft brush; a suede brush once dry to lift the nap | A proofing product meant for nubuck or suede | Waxes flatten the nap and darken the colour |
| Synthetic fabric and mesh | Water and a soft brush; rinse grit out of the mesh | A spray-on proofer if water has stopped beading | Mesh traps fine grit, which wears at the fibres from inside |
| Any boot with a waterproof lining | As for its outer material | Wipe the lining with a damp cloth now and then | Sweat leaves salt behind; follow the maker’s advice on rinsing inside |
While it is apart
A boot with the laces and insoles out is as easy to inspect as it will ever be. A minute spent looking finds small problems while they are still cheap to fix.
| No. | Look at | Looking for | What it suggests |
|---|---|---|---|
| 1 | Collar and lining | Worn-through patches, rucked fabric | A likely source of rubbing |
| 2 | Laces and eyelets | Fraying, bent or loose hooks | New laces are cheap; replace before one snaps |
| 3 | Seams | Lifted or broken stitches | Clean and watch; a repairer if it spreads |
| 4 | Toe rand | Edges peeling away from the upper | Catch it early, while it can be re-glued |
| 5 | Welt | A gap opening between upper and sole | The start of the sole parting; a repairer’s job |
| 6 | Outsole lugs | Rounded, shallow or missing blocks | Less grip, most noticeable on wet ground |
| 7 | Insole | Flattened, cracked or curling | Replace; it changes the fit |
Putting them away
Dry means dry all the way through, which usually takes longer than it looks: a boot can feel dry to the hand and still be damp inside. Leave the laces loose and the tongue pulled forward, and store the pair somewhere cool and airy. A sealed bag or a hot car is the wrong place.
The rest of the kit follows a similar pattern, set out in the care rhythm.